PDF Settings - Prenly
When a new edition is uploaded to Webarch, there are also various settings that you can make with the PDF when uploading.
Here we will show you what those settings mean and do.
1. Publish day
This means which day you want the issue to be "published" in your e-magazine. The format must always be YYYY-MM-DD, for example, 2022-01-01.
2. External ID (Optional)
External ID is completely optional to fill in. This box is only used internally (unless otherwise is said from Helpdesk) and is not something that will be visible to readers of the magazine.
An example of what you can write here is the e-papers publish number, the internal name of the issue, or other information you as a customer want. For example, Maybe the magazine is called "Test" and then you choose to enter "NR 1" in the box for External ID, so that you yourself know.
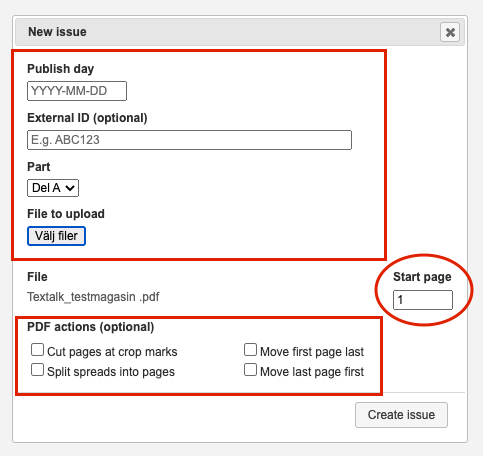
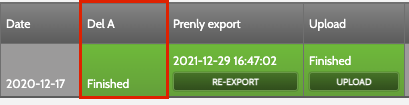
3. Part
Most newspapers have only 1 "Part A". You can easily see this in your newspaper at the top of the menu. See the picture below. When you upload a PDF, do not change this box, just leave it as is.
4. File to upload
Here you select the file (issue/magazine) to be uploaded to the system.
5. File
Here you see which file you have chosen to upload, check that it is the correct version, file name and file format.
6. Start Page
Indicates which page the PDF starts on. You should not change anything here, just leave it as it is. The PDF should always start on page 1.
7. PDF actions (Optional)
7.1 Cut pages at crop marks
Only mark this box if the issue contains cut marks, otherwise, you leave it blank.
7.2 Split spreads into pages
If the edition is structured as a spread instead of pages, click in this box otherwise leave it blank.
7.3 Move first page last
Marke the box if you want to move the front page to the end of the issue, otherwise leave this box empty.
7.4 Move last page first
Marke the box if you want to move the last page to the beginning of the issue, otherwise leave this box empty.
8. Create issue
And finally, when you have made the desired settings, click on the "Create issue" button to upload the issue to the system. This is where our operators will take ower, and complete the export.